Zabbix 3.0 on CentOS 7
Install Zabbix 3.0 on CentOS 7
What is Zabbix
Zabbix is an enterprise-class open source distributed monitoring solution.
Zabbix is software that monitors numerous parameters of a network and the health and integrity of servers. Zabbix uses a flexible notification mechanism that allows users to configure e-mail based alerts for virtually any event. This allows a fast reaction to server problems. Zabbix offers excellent reporting and data visualisation features based on the stored data. This makes Zabbix ideal for capacity planning.
Zabbix supports both polling and trapping. All Zabbix reports and statistics, as well as configuration parameters, are accessed through a web-based frontend. A web-based frontend ensures that the status of your network and the health of your servers can be assessed from any location. Properly configured, Zabbix can play an important role in monitoring IT infrastructure. This is equally true for small organisations with a few servers and for large companies with a multitude of servers.
Zabbix is free of cost. Zabbix is written and distributed under the GPL General Public License version 2. It means that its source code is freely distributed and available for the general public.
Before Starting Installation, first update your system using below command :
[user@testmachine ~]$ sudo -i
[root@testmachine ~]# yum -y update
[root@testmachine ~]# reboot -n
Prerequisites
Before install zabbix, we should have install and configure LAMP stack. To install and configure LAMP server on CentOS 7, lease refer following link:
Enable EPEL and Zabbix Repository
Zabbix package is not available in the default yum repository, so we will enable zabbix and epel repository using below commands.
[user@testmachine ~]$ sudo -i
[root@testmachine ~]# yum install epel-release
[root@testmachine ~]# rpm -ivh https://repo.zabbix.com/zabbix/3.0/rhel/7/x86_64/zabbix-release-3.0-1.el7.noarch.rpm
Install Zabbix Packages
Install Zabbix packages. Example for Zabbix server and web frontend with mysql database.
[root@testmachine ~]# yum -y install zabbix-server-mysql zabbix-web-mysql zabbix-agent
Creating initial database
Login to MariaDB
[root@testmachine ~]# mysql -u root -p
Create a database called 'zabbix_db' and database user called 'zabbixusr'
MariaDB [(none)]> create database zabbix_db character set utf8;
MariaDB [(none)]> GRANT all privileges ON zabbix_db.* TO 'zabbixusr'@'127.0.0.1' IDENTIFIED BY 'abc123';
MariaDB [(none)]> GRANT all privileges ON zabbix_db.* TO 'zabbixusr'@'localhost' IDENTIFIED BY 'abc123';
MariaDB [(none)]> flush privileges;
Now import the database schema using below commands
[root@testmachine ~]# cd /usr/share/doc/zabbix-server-mysql-3.0.4/
[root@testmachine zabbix-server-mysql-3.0.4]# zcat create.sql.gz | mysql -uroot zabbix_db
Starting Zabbix server process
Edit database configuration in zabbix_server.conf
[root@testmachine ~]# cd /etc/zabbix
[root@testmachine zabbix]# vim zabbix_server.conf
DBHost=localhost
DBName=zabbix_db
DBUser=zabbixusr
DBPassword=abc123
Start zabbix server process and make it start automatically after every reboot
[root@testmachine ~]# systemctl start zabbix-server
[root@testmachine ~]# systemctl enable zabbix-server
Now we have to set zabbix server to monitor itself, to do that, we need to edit file on /etc/zabbix/zabbix_agent.conf
[root@testmachine ~]# vim /etc/zabbix/zabbix_agent.conf
##### Passive checks related
## Line 95 ##
Server=127.0.0.1

## Line 103 ##
ListenPort=10050

##### Active checks related
## Line 136 ##
ServerActive=127.0.0.1
Start zabbix agent process and make it start automatically after every reboot
[root@testmachine ~]# systemctl start zabbix-agent
[root@testmachine ~]# systemctl enable zabbix-agent
Browse zabbix web interface and continue configuration
http://x.x.x.x/zabbix
Replace the ip address or hostname as per your setup
Click on 'Next Step'
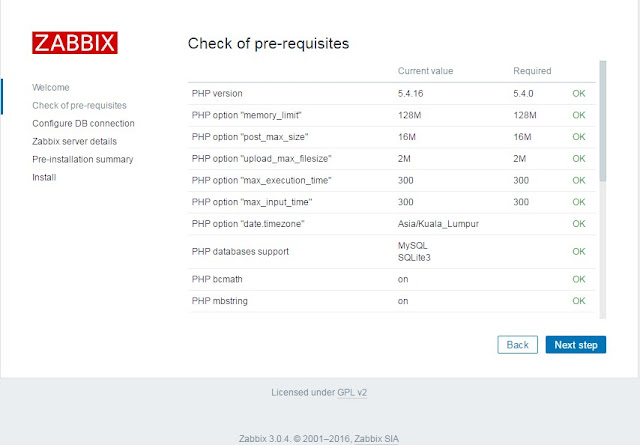
On this step zabbix prerequisites are checked and verified
Click on 'Next Step'
Specific the zabbix databases name, databases user and password
Click on 'Next Step'
Specific the zabbix server details and port number
Click on 'Next Step' to continue
Summary of Zabbix Server, click on 'Next step' to continue
As we can see that Zabbix installation is completed successfully
When we click on 'Finish', it will redirect to the zabbix web interface console
Username as 'admin' and password 'zabbix' by default, you may change the password after login
This is how the admin dashboard view:
Conclusion
In this tutorial, we have covered only installation part and basic configuration of Zabbix, to learn more about Zabbix please explore all the options in the Zabbix Dashboard one by one and set up as suits to your environment.
For more information about configurations and usage, please refer to Zabbix Official manual.


Comments